UV DTF transfer is redefining garment decoration with vibrant color, strong adhesion, and fast production. By blending traditional DTF printing with UV-curable inks, you gain speed without sacrificing detail, making UV printing on textiles ideal for high-contrast designs. To reach repeatable results, invest in the right heat press settings and a clean substrate prep for DTF routine that minimizes wrinkles and edge misregister. A consistent workflow, including calibration, color management, and curing checks, helps you avoid common issues like dull colors or poor adhesion. With careful setup and practical testing, UV DTF transfer delivers punchy imagery on a range of fabrics while keeping production efficient.
Think of this method as a UV-activated textile transfer, where UV-curable inks bond to a transfer film and then fuse with fabric under heat. This alternative framing—digital-to-fabric transfer, UV-curable textile application, or UV inks on garments—highlights the same process from a different vocabulary. From an SEO and LSI perspective, emphasis on substrate preparation, precise heat press actions, and reliable curing helps search engines connect related topics like DTF printing and UV printing on textiles. When you frame the technique this way, you emphasize adaptability, speed, and durable color across a variety of fabrics.
Understanding UV DTF transfer: Key concepts and benefits
UV DTF transfer fuses DTF printing concepts with UV-curable inks printed on a transfer film. When heat and pressure are applied, the print bonds to textile, delivering sharp edges and vibrant color quickly and with minimal wait time.
Knowing the basics helps you control color accuracy, edge definition, and durability across fabrics. Choose the right printer, UV inks, and transfer film, and understand how substrate prep for DTF and heat press settings influence the final result to reduce waste and rework.
Substrate prep for DTF: Achieving a flawless surface
Substrate prep for DTF starts with a clean, dry surface free of dust, oils, and residues. For textiles, pre-washing and light pre-pressing can stabilise the fabric and improve adhesion for UV DTF transfers.
Evaluating fabric type and finishes helps you predict behavior during curing and bonding. Cotton, polyester blends, and polyesters respond differently to UV inks, so testing a small sample ensures you pick the right substrate and finish, supporting strong adhesion and color vibrancy.
DTF printing vs UV printing on textiles: Merging strengths for vibrant results
DTF printing and UV printing on textiles each offer strengths. DTF printing provides efficient transfer for full-color designs, while UV printing on textiles delivers instant curing and crisp details, especially on solid blocks and fine lines.
To maximize outcomes, calibrate printers and films for the specific inks you use. Keep ink batches, film, and curing lamps consistent to preserve color fidelity across runs, and perform a reference swatch check to adjust saturation and any white underbase.
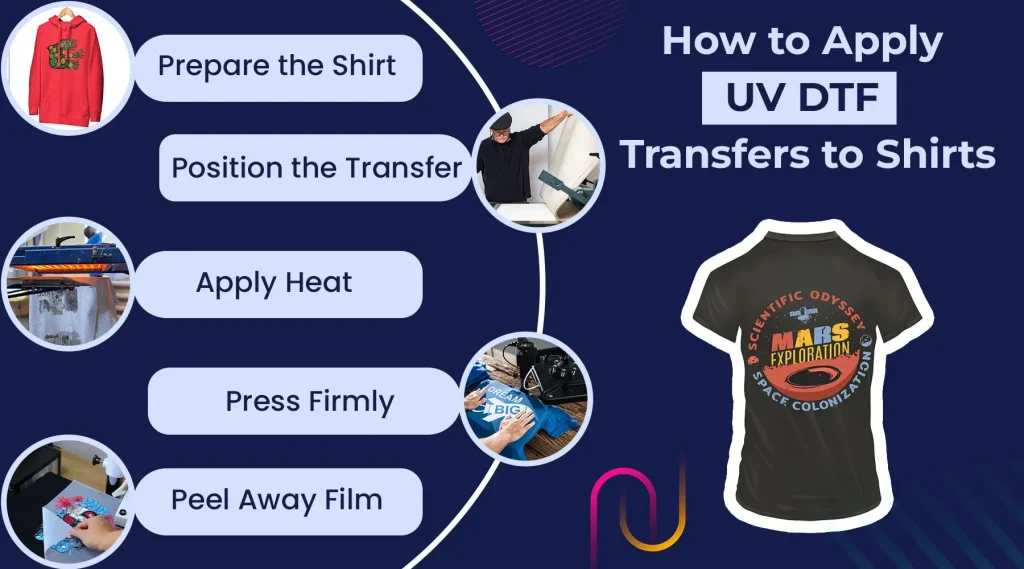
Heat press settings for durable UV DTF transfers
Heat press settings determine adhesion and curing quality. Start with a mid-range temperature around 155–180°C (310–356°F), then adjust for the adhesive film and fabric weight, ensuring even contact across the platen.
Time and pressure matter too. Typical presses run 10–20 seconds with a medium to heavy pressure, but lighter fabrics may benefit from shorter times. After pressing, perform UV curing to lock the inks and finish the bond, using a test strip to fine-tune cure times.
Squeegee technique and alignment for crisp UV DTF transfers
Squeegee technique and alignment play a big role in a clean transfer. Apply firm, even pressure, and use steady center-to-edge strokes to push adhesive evenly and squash air pockets that cause ghosting.
For multi-color or large area designs, double-check alignment before heat. A quick light tap or cold lamination readout can confirm placement, and if needed, re-align and re-run a test to prevent misregistration.
Troubleshooting, finishing, and quality checks for UV DTF
Common issues include poor adhesion, faint colors, ghosting, or warping. Revisit substrate prep for DTF, ensure the substrate is dry, and verify the transfer film adheres to the fabric. If colors look dull, slightly adjust cure time or lamp intensity.
Finish with a clear quality check routine and a standard operating procedure. Document settings from substrate prep to post-cure, keep swatches for fabrics and colors, and provide care instructions to customers to protect the UV DTF transfer over time.
Frequently Asked Questions
What is UV DTF transfer and how does it relate to DTF printing?
UV DTF transfer uses UV-curable inks printed onto a transfer film, which is then bonded to a textile with heat and pressure. It blends the color fidelity and detail of DTF printing with the rapid curing of UV inks, enabling faster production and sharp edges. This method differs from traditional DTF printing because the ink cures instantly under UV light and relies on a film-to-substrate transfer for adhesion.
Which fabrics are best for UV DTF transfer and how should you prepare the substrate for DTF?
Aim for fabrics like cotton, polyester blends, and polyesters that take color well. Avoid materials with coatings that hinder ink adhesion. Substrate prep for DTF includes cleaning and drying the surface, pre-washing textiles to reduce shrinkage, and a light pre-press or heat setting to stabilize fibers. Testing a small sample helps ensure reliable adhesion and vibrancy.
What heat press settings are recommended for UV DTF transfer to get reliable results?
Start with typical ranges: around 155–180°C (310–356°F) for 10–20 seconds, using a medium‑heavy pressure. Always follow the film/ink manufacturer’s guidelines and run a test strip to fine-tune time, temperature, and pressure. Consistent heat press settings are key to proper cure and adhesion in UV DTF transfer.
How do you ensure precise alignment and prevent ghosting when applying a UV DTF transfer?
Focus on meticulous alignment and a solid squeegee technique. Apply firm, consistent pressure and use center‑to‑edge strokes to push out air. Check alignment before heat application, and use a quick verification method (like a light read or gentle test) to confirm placement without committing the transfer.
What are common issues with UV DTF transfer, and how can you troubleshoot them?
Common issues include poor adhesion, faint colors or edge loss, ghosting, and fabric warping. Troubleshoot by ensuring thorough substrate prep and drying, performing a pre‑press to flatten the surface, verifying ink density and alignment, and adjusting cure time or lamp intensity. A white underbase can improve color coverage on dark fabrics when needed.
What post-transfer finishing steps and care help UV DTF transfers last longer?
After bonding, perform UV curing to fully set the inks, with a possible post‑cure at low heat to finish the process. Provide end‑user care guidance: wash inside‑out in cold water with mild detergent and avoid high heat in the dryer to preserve color and adhesion over time.
| Key Point | Summary |
|---|---|
| Understanding UV DTF Transfer Basics | Combines UV‑curable printed ink on transfer film bonded to fabric with heat and pressure; faster production and control over color, edge sharpness, and durability; relies on printer, UV inks, transfer film, and substrate. |
| Preparation and Substrate Readiness | Start with a clean, dry substrate; pre‑wash textiles; light heat‑setting if needed; test fabrics; choose fabric type (cotton, polyester blends, polyesters) and consider weight, weave, and finishes; use pre‑heat/pre‑press to flatten surface. |
| Printing Considerations: DTF Printing and UV Printing on Textiles | DTF printing sits at the intersection of digital design and film transfer; UV printing uses UV‑curable inks for instant cure; calibrate printer, use consistent ink batches and film, and perform color checks with reference swatches to adjust saturation/underbase. |
| Squeegee Technique, Application, and Alignment | Apply film with firm, consistent pressure; steady strokes from center outward; double‑check alignment before heat; manage air pockets to prevent ghosting or misregistration. |
| Heat Press Settings and Curing Parameters | Temperature around 155–180°C (310–356°F) depending on film; 10–20 seconds press time; medium‑heavy pressure; ensure even contact; UV curing after bonding; post‑cure optional for full cure. |
| Post‑Transfer Finishing and Quality Checks | Inspect color uniformity, edge sharpness, and misregistration; perform rub test for adhesion; provide care instructions (wash cold inside‑out, low heat dry) to preserve longevity. |
| Troubleshooting Common Issues | Address adhesion, color fade, ghosting, or warping by reviewing substrate prep, curing, alignment, and material compatibility; use test runs to validate fixes. |
| Best Practices for Consistency and Scale | Develop SOPs, run regular calibrations (printer, film, curing lamp), keep a swatch library, and invest in quality consumables to reduce variability and waste. |
Summary
HTML table summarizing key points about UV DTF transfer. After the table, a descriptive SEO-focused conclusion is provided with the term UV DTF transfer included in the first sentence.